使用 apollo 搭配 github api 实现 gist 的获取和创建
本篇文章记录了“如何在 node 环境下采用 graphql 的形式来请求 rest 形式的接口和 graphql 形式的接口”。
阅读本篇文章,你需要有如下的知识储备:
- 对 graphql 有所了解
- 对 es6+ 语法有所了解
- 对 nodejs 有所了解
- 熟悉 github
接口平台选用 github api ,因为它既提供了 rest 接口,也提供了 graphql 接口,真是妙哉。对于 graphql 的操作我选用 apollo platform 提供的相关包,因为该平台是(我认为)目前对 graphql 解决方案提供最为完整的平台。
一、热身
使用 github 提供的 graphql explorer 来在线体验使用 graphql 请求 graphql 接口,可免去自行配置本地开发时的苦恼,方便地感受 graphql 的魅力。但由于目前 github 的 graphql 接口并未提供对 gist 的改动操作,比如新建、删除等,仅提供了获取。所以...我成功找到了一个让我去本地配置开发环境的理由,于是诞生了这篇文章。
二、项目初始化
npm i npx -g
npm init -y
npm i typescript ts-node
npm i apollo-link apollo-link-http apollo-link-rest graphql graphql-anywhere graphql-tag qs node-fetch
npm i @types/node-fetch -D
然后建立 typescript 的配置文件 tsconfig.json:
{
  "compilerOptions": {
    "moduleResolution": "node",
    "target": "es6",
    "skipLibCheck": true,
    "noEmit": true,
    "alwaysStrict": true
  },
  "exclude": ["node_modules"]
}
三、获取接口调用令牌
调用 github 的 api 需要使用令牌,可在 token管理 页面新建 token,输入名称并选择权限,然后生成:
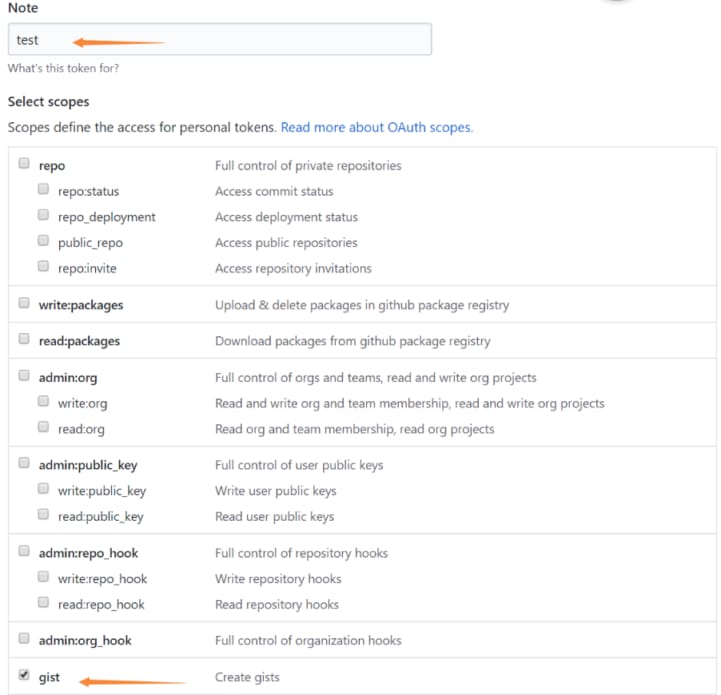 点击生成之后会得到 token 值,保存该值,后面会在请求时用到它。
四、请求 graphql 接口
下面是请求 github api 的 graphql接口 来获取自己创建的前两个 gist。将下述代码覆盖写入 index.ts 中并使用 npx ts-node index.ts 运行,控制台会打印我们指定的字段数据。
import { execute, makePromise, GraphQLRequest } from "apollo-link";
import { createHttpLink } from "apollo-link-http";
import gql  from "graphql-tag";
import nodeFetch from "node-fetch";

const token = '将token值写在这里(提醒:若在生成环境下,请勿将敏感信息直接写在业务代码内)';

const httpLink = new createHttpLink({
  uri: `https://api.github.com/graphql`,
  headers: {
    Authorization: `bearer ${token}`
  },
  // @ts-ignore
  fetch: nodeFetch // 解释:默认apollo在请求时是基于浏览器环境的,但node环境下并没有fetch api,因此我们需要导入一个两种环境都可用的包来代替
})

const operation: GraphQLRequest = {
  query: gql`
    query {
      viewer {
        gists(privacy: ALL, first:2) {
          edges {
            node {
              createdAt
              name
            }
          }
        }
      }
  `
}

makePromise(execute(httpLink, operation)).then(data => {
  console.log(`data is:\n${JSON.stringify(data, null, 2)}`);
}).catch(err => {
  console.log(`error is:`);
  console.log(err);
});
代码解释:使用 graphql 的方式去请求 graphql 接口写起来是十分方便的,俺没啥要解释的。
五、请求rest接口
下面是请求 github api 的 rest接口 来新建 gist。将下述代码覆盖写入 index.ts 中并使用 npx ts-node index.ts 运行,控制台会打印我们指定的响应数据,并且去查看自己的 github gist 列表会发现新增了一个 gist。
import { execute, makePromise, GraphQLRequest } from "apollo-link";
import { RestLink } from 'apollo-link-rest'
import gql  from "graphql-tag";
import nodeFetch from "node-fetch";

// @ts-ignore
global.Headers = nodeFetch.Headers; // 这一步的作用依然是解决包运行环境问题:当apollo-link-rest运行在node端时需要设置该项,否则会报错。

const token = '将token值写在这里(提醒:若在生成环境下,请勿将敏感信息直接写在业务代码内)';

const restLink = new RestLink({
  uri: 'https://api.github.com',
  headers: {
    Authorization: `bearer ${token}`
  },
  // @ts-ignore
  customFetch: nodeFetch // 小提示:apollo-link-rest使用customFetch字段,apollo-link-http中使用fetch字段
})

const createGistOperation: GraphQLRequest = {
  query: gql`
    mutation($body: FakeNameInput) {
      createGist(body: $body) @rest(path: "/gists", method: "POST", bodyKey: "body") {
        url
      }
    }
  `,
  variables: {
    body: {
      files: {
        'test.txt': {
          content: "hello world!"
        }
      },
      description: "it's a test gist",
      "public": "false"
    }
  }
}

makePromise(execute(restLink, createGistOperation)).then(data => {
  console.log(`data is:\n${JSON.stringify(data, null, 2)}`);
}).catch(err => {
  console.log(`error is:`);
  console.log(err);
});

代码解释:刚开始编写这种使用 graphql 的形式请求 rest 接口时,写起来感觉真是怪怪的,但多写几次会发现它确实比普通的请求方式更易阅读甚至更易书写(个人感悟:那些初期看起来很费劲的东西,总能在后期发挥巨大潜力)。在上述代码中,我们使用 @rest 指令来表明这是在请求一个 rest 接口,该指令的参数 bodyKey 用来指明 POST 请求的 body 体数据,它的值对应了 variables 字段中的键名 (查看 文档 获取更详细说明)。
小结
突然结尾:graphql 真的很有趣 ~